Introduction
That yellow tint is driving you nuts. You’re not alone—many users are battling this annoying color issue.
But before you start tossing your laptop out the window, let’s hit pause.
There are quick fixes that can turn that sour screen back to vibrant colors. From tweaking settings to updating drivers, we’ll explore simple steps to get your display back on track.
So grab your laptop, and let’s dive into the solutions that will make your screen pop again!
What Causes Your Screen to Display a Yellow Tint?
The yellow tint issue on Windows 11 can be frustrating, but understanding its causes is the first step toward resolving it.
- Night Light Feature: Reduces blue light; may cause a yellow tint on Windows 11 screens, leading to a yellowish appearance.
- Color Calibration: Incorrect color profile or calibration settings can cause a yellow screen issue. This can result from manual adjustments or software changes, affecting color accuracy.
- Graphics Driver Issues: Outdated or corrupted drivers may cause color anomalies.
- Hardware Problems: Faulty displays, graphics cards, or cables can distort colors.
- External Factors: Ambient lighting or screen filters can make colors appear warmer.
- Display Settings and Third-Party Software: Some settings or apps may alter color output, leading to a yellowish hue.
By identifying potential causes, users can more effectively troubleshoot and restore their display to its intended color balance.
Troubleshooting Method To Fix Windows 11 Tint Issue
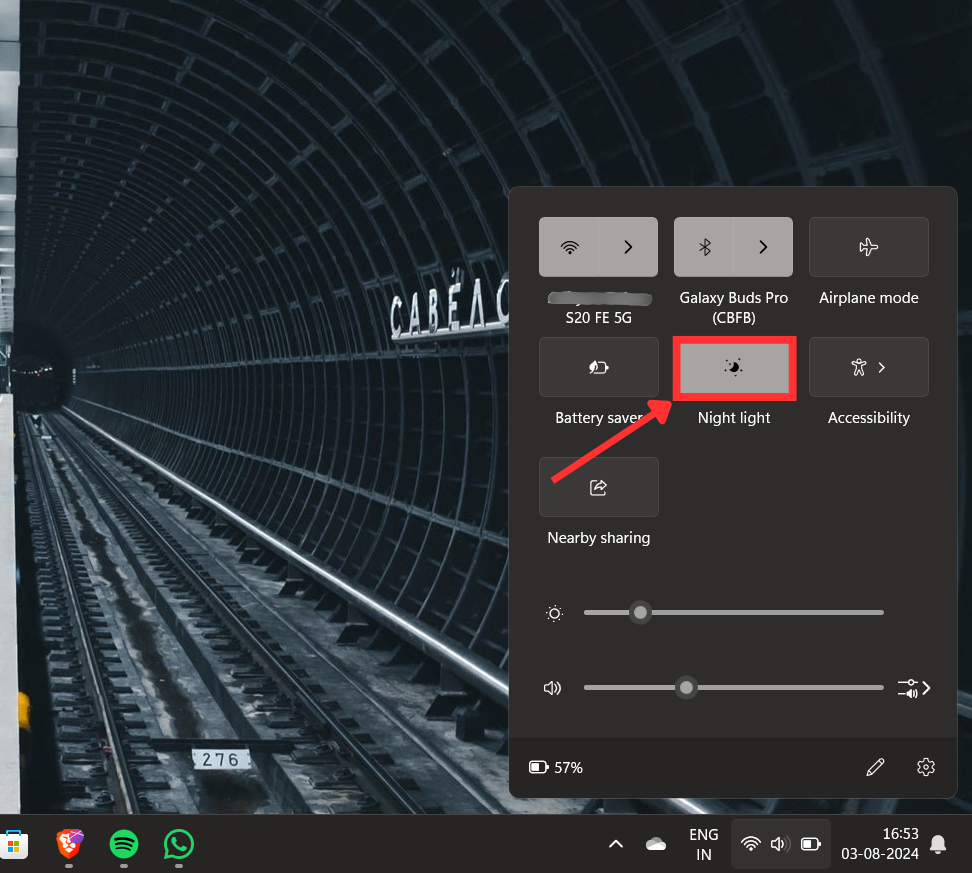
1. Disable Night Light
If your Windows 11 screen exhibits a yellowish tint, the Night Light feature could be the underlying cause. This built-in blue light filter, specifically engineered to reduce eye strain by adjusting the color temperature, is generally effective. However, it can occasionally result in an unintended yellow screen effect.
2. Calibrate Your Screen
Color calibration is crucial for achieving accurate color rendering, especially if your screen has developed a yellowish hue. This process helps align your display’s color profile, correcting any discrepancies caused by outdated graphics drivers or incorrect settings.
Step 1
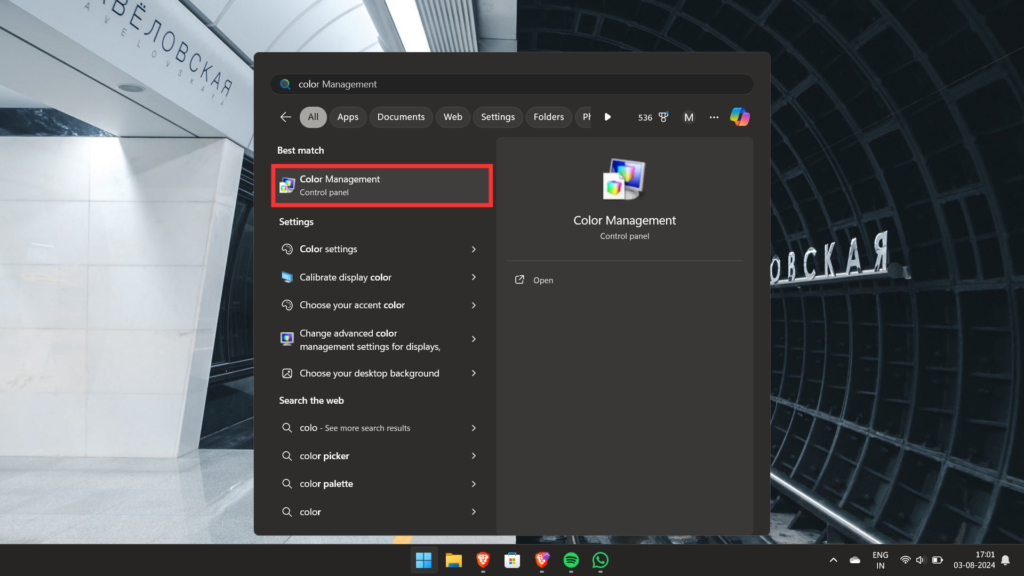
Search Color Management and open it
Step 2
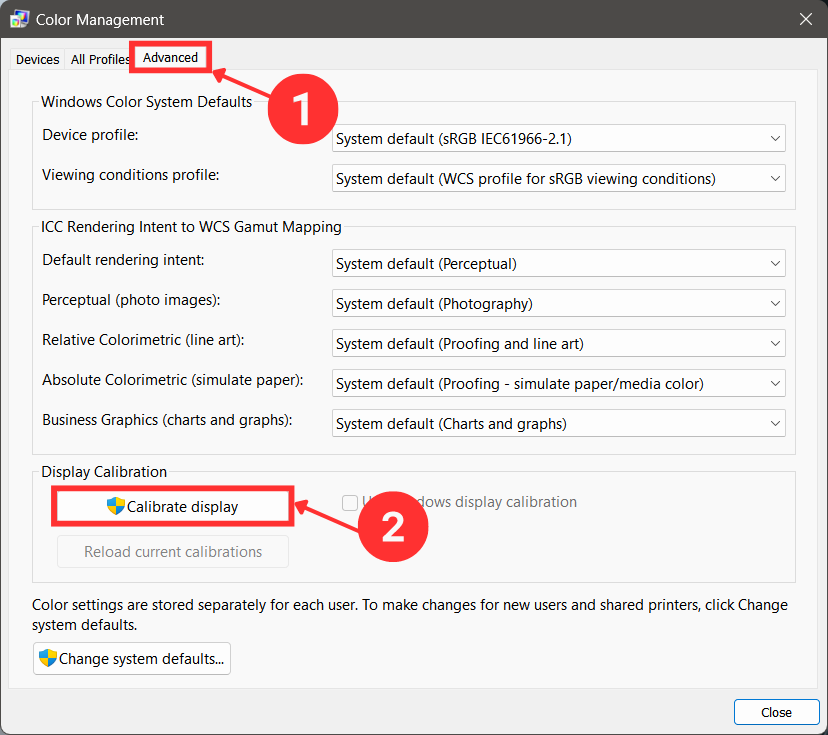
Go to Advanced Tab
Step 3
Under Display Calibration, Select Calibrate Display
Step 4
Now the Color Calibration tool will welcome you with instructions to follow.
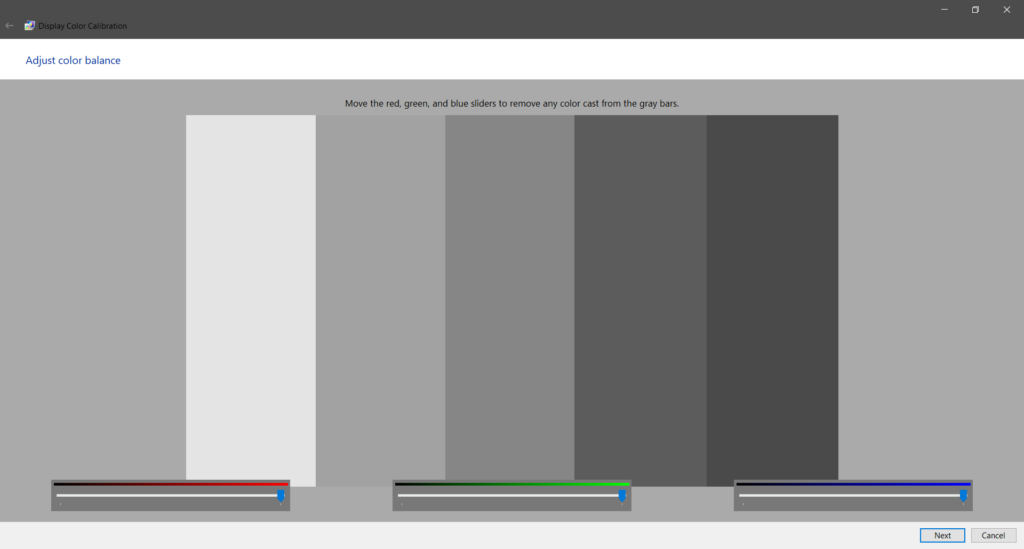
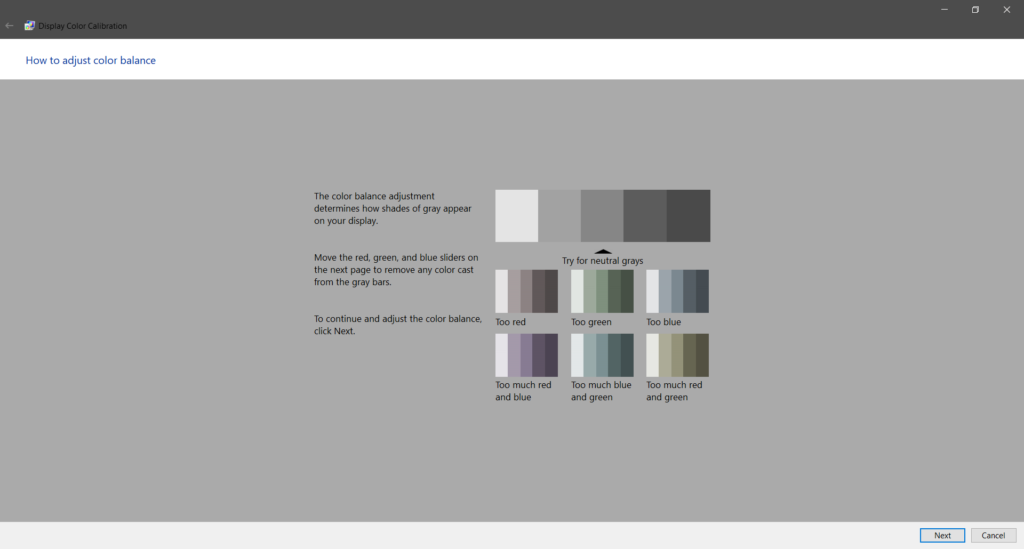
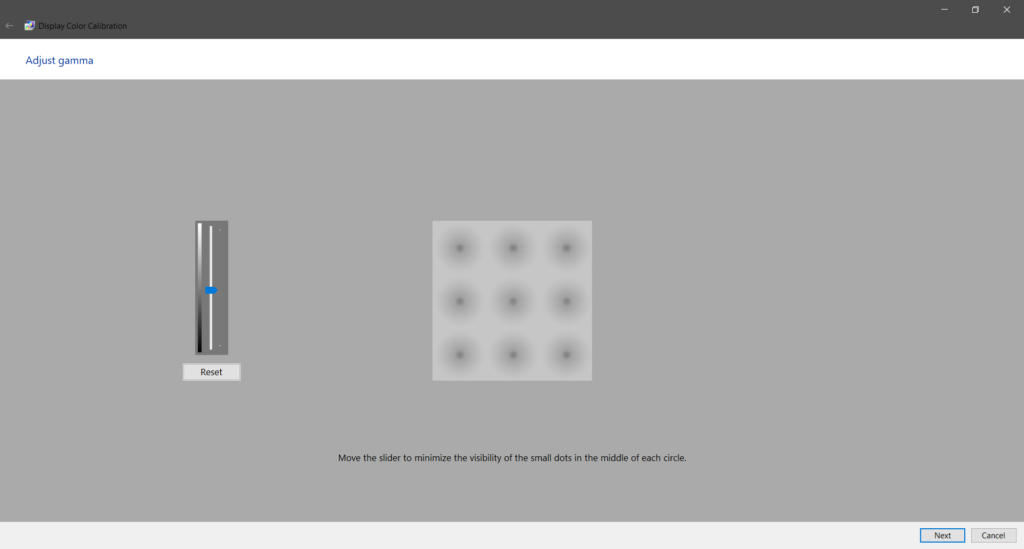
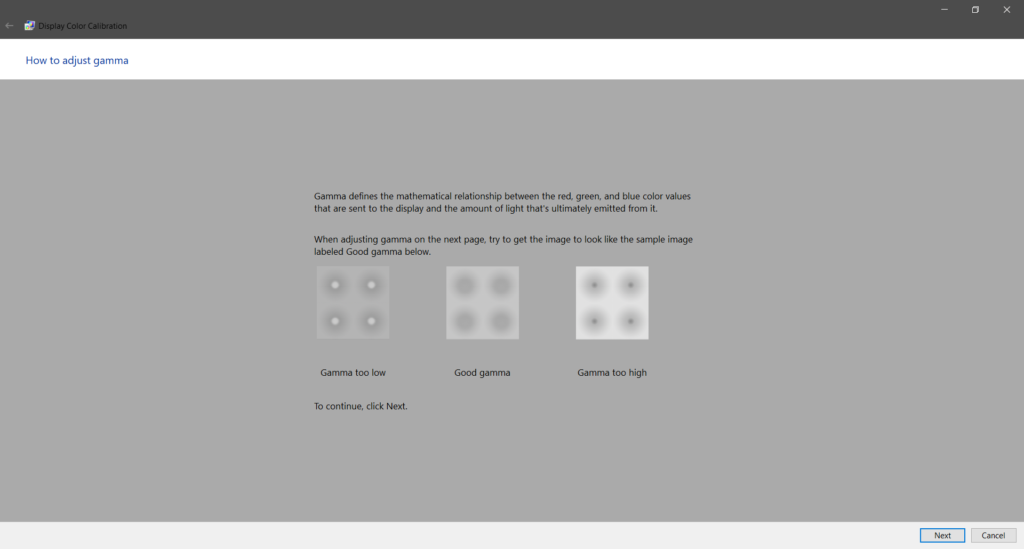
Proper calibration ensures your screen displays colors accurately, resolving the yellow tint issue and enhancing your overall visual experience.
3. Modify your Display’s Color Profile
Modifying your display’s color profile can often resolve the issue. This adjustment helps correct color rendering issues by aligning the display’s color output with industry standards, ensuring more accurate and vibrant colors. Pay close attention to the settings for gamma, brightness, and contrast to enhance your screen’s display further. Follow the steps:
Step 1
Search and open Color Management

Step 2
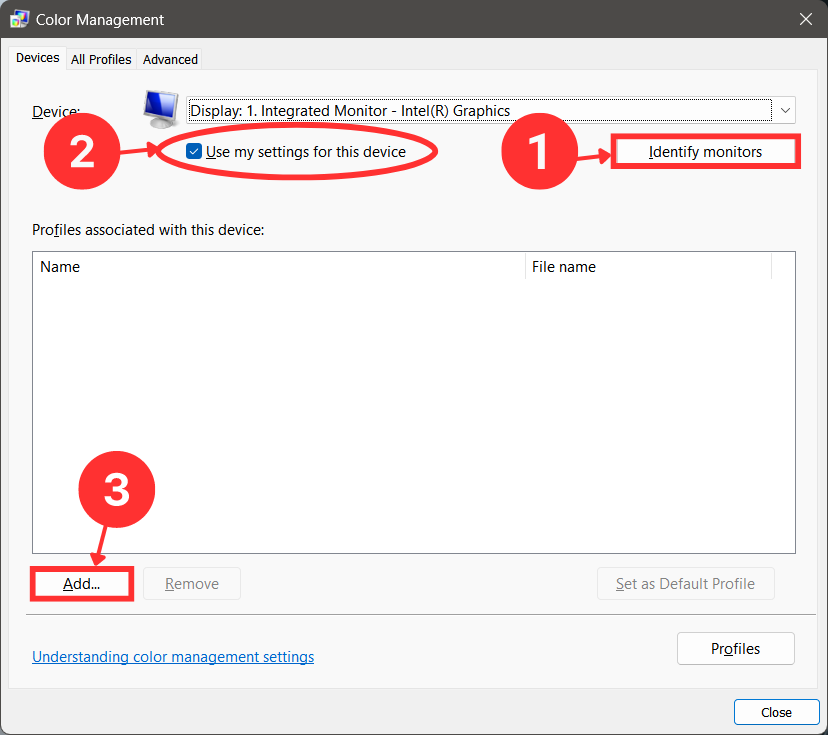
Click on “Identify Monitors”
Step 3
Now click on “Use my setting for this device” and then click Add situated at the bottom
Step 4
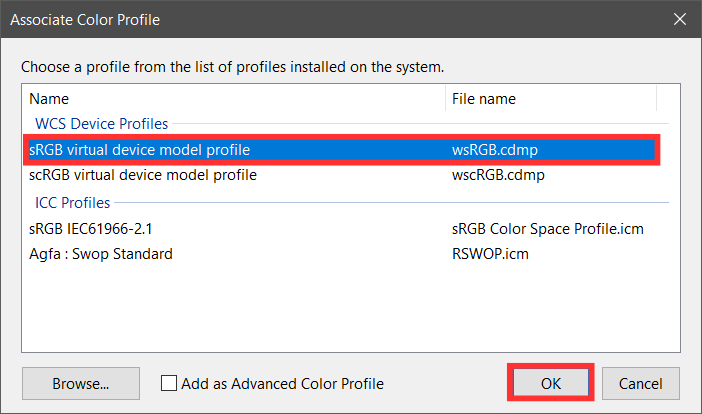
Now choose the “sRGB virtual device model profile” and click ok
Step 5
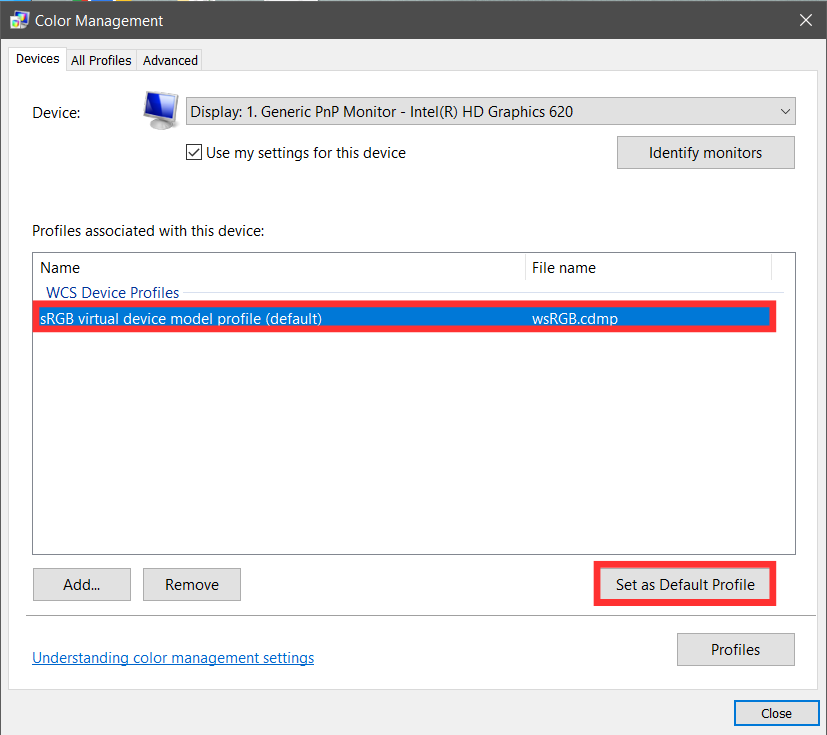
You will be taken back to the Color Management window, now click on the color profile you added and Select “Set as Default Profile”
4. Update Display Driver
If the above methods do not fix the yellow tint issue, then we recommend that you update your display driver. Outdated or faulty graphics drivers can cause color inaccuracies, including an unwanted yellowish hue. Keeping your graphics drivers up to date ensures that any issues with color rendering are resolved, as updated drivers often come with fixes for known problems and improvements for better color accuracy.
Step 1
Search and Open Device Manager
Step 2
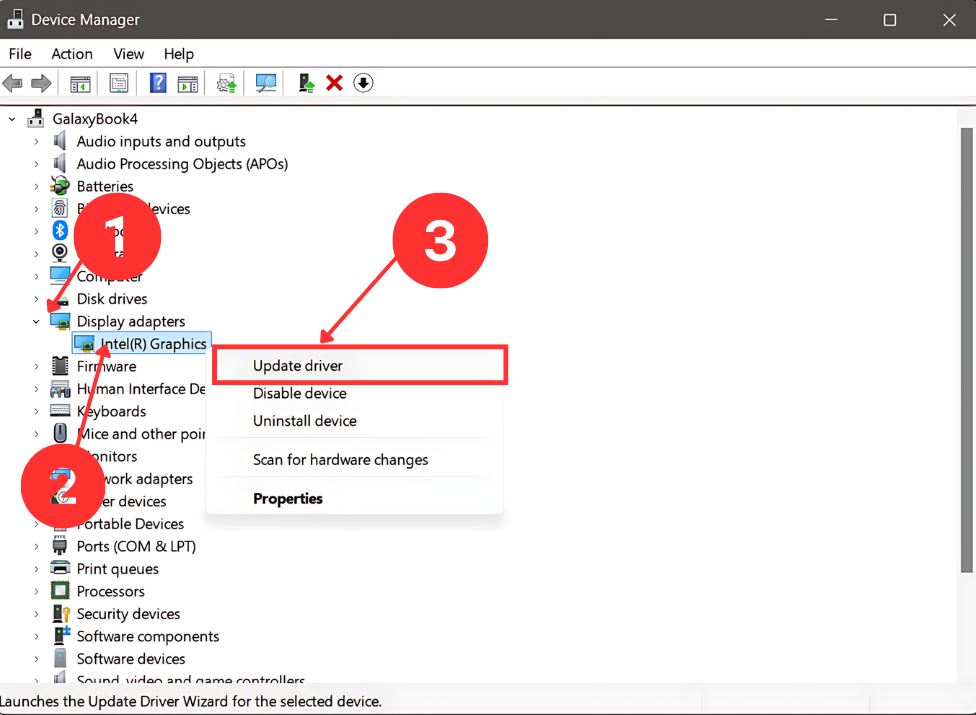
Expand Display Adapter
Step 3
Now right-click on your graphics driver and select Update driver
Step 4
Choose “Search Automatically for Drivers”
If the yellow tint issue persists after the update, consider manually downloading the latest drivers from the manufacturer’s website or using a third-party driver update tool for a more thorough check.
5. Check your Hardware
Now you must also check if your monitor is faulty or not. You can test this by connecting a different monitor if it does not display a yellowish tint then your original Monitor is compromised, consider buying a new one or take it to a repair shop. Also, it would be good to check the cables.
If you have a Yellowish tint on your laptop screen then we recommend you take your laptop to your Manufacturer’s Service center.
Seeking Further Help
If you’ve tried all the troubleshooting tips for fixing that yellowish tint on your Windows 11 screen and it’s still not right, here’s what you can do next:
- If the problem continues, it might be time to call in a pro. A technician can look closer and check for any hardware issues that might be causing the color problems.
- Microsoft Support is there to help. They can offer tailored advice for Windows 11 and might have additional steps or updates that could fix the issue.
- Sometimes other users have faced the same problem and found a solution. Look at forums like Microsoft Community.
