

Introduction
Encountering the “PC Ran Into a Problem” error can feel like hitting a speed bump on the digital highway. This notorious glitch not only disrupts your workflow but can also signal deeper issues lurking in your system’s engine room. Addressing this error promptly isn’t just about smoothing out your current ride; it’s about preventing future breakdowns that could leave you stranded in the middle of nowhere, digitally speaking. Fear not, dear amateur PC users, for this guide is your GPS through the tech wilderness. With simple, jargon-free directions, we’ll help you navigate back to clear, calm waters. No prior technical knowledge? No problem. Consider this your friendly roadside assistance, ready to get you back on track with ease.
Blue Screen Of Death
Encountering the Blue Screen of Death (BSOD) on Windows indicates your device has run into a critical issue that necessitates a restart, often displaying the message “Your PC ran into a problem.” This formidable blue screen is a safeguard against further damage, prompting immediate action to fix the underlying problem. Solutions range from simple restarts to more complex fixes like booting in Safe Mode, performing Startup Repair, using System Restore, or running Command Prompt for deeper system file checks. It’s vital to address disk or hard drive corrupt, uninstall recent updates or software, and even consider reinstalling Windows if necessary. Understanding BSOD error codes can guide you to specific fixes, minimizing data loss and restoring system stability swiftly.
Whenever a device runs into an issue that necessitates a restart, it will show a blue screen with one of the various stop codes, each pinpointing a distinct problem, for instance:
- INACCESSIBLE_BOOT_DEVICE
- BAD_SYSTEM_CONFIG_INFO
- CRITICAL_PROCESS_DIED
- Stop code: 0xC0000021A
- FAULTY_HARDWARE-CORRUPTED_PAGE
- DPC_WATCHDOG_VIOLATION
- KERNEL_SECURITY_CHECK_ERROR
- SYSTEM_THREAD_EXCEPTION_NOT_HANDLED
These are several error codes displayed on the BSOD screen. But have you ever wondered why this error occurred?
- Disk Errors: Hard drives or SSDs on your computer may contain bad sectors, preventing Windows from loading and running properly.
- Temperature Issues: Excessive heat can damage computer performance and prevent the operating system from functioning correctly.
- Faulty Hardware: Incompatible memory, graphics cards, or improper BIOS settings.
- Software Configuration: Pay attention to incorrect registry settings, recently installed applications, system updates, drivers, etc.
- Problematic Windows Updates: Updates that cause issues with system stability or performance.
- Corrupt or Faulty Device Drivers: Drivers that are corrupt or not functioning properly.
- Missing or Corrupted System Files: Essential system files that are missing or damaged.
- Problematic Third-Party Applications: Issues caused by software installed from third-party sources.
- Incorrect Memory Dump Settings: Misconfigured settings for memory dumps.
- Malware or Virus Attacks: Infections that disrupt system operations.
- Drive Failures: Issues related to hard drive or SSD failures.
- Registry Issues: Problems with the Windows registry, such as incorrect configurations or deletions.
- Improper Shutdowns: Forced or improper shutdowns leading to system errors.
- Loose Hard Drive Connections: Physical disconnection or loose connections of the hard drive.
- RAM Issues: The operating system is unable to handle the current RAM usage.
Now we will be applying some troubleshooting steps to solve Blue Screen of Death error.
Troubleshooting Methods To Fix PC Ran Into a Problem
There will be various troubleshooting methods designed for different scenarios that you will need to follow.
Scenario 1: Windows Boot after Restart
If your Windows boots normally after Restart then follow the below methods.
1. Check the Disk
Verifying the disk is akin to running the CHKDSK command, which addresses disk errors such as bad sectors and file system issues. If your PC shows error message like “Your PC ran into a problem and needs to restart” with “INACCESSIBLE_BOOT_DEVICE,” it might indicate file system errors on your hard drive. Therefore, checking the disk’s health is recommended to ensure smooth operation of your system. Perform a system scan by following steps:
Step 1
Open This PC
Step 2
Right Click on the Drive whichever contains Windows and Select Properties
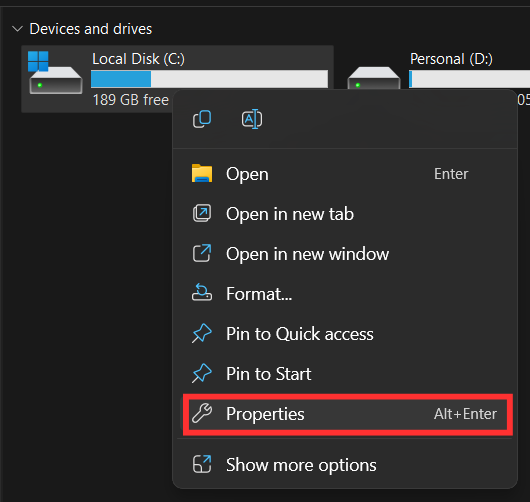
Step 3
Go to Tools and under Error checking select “check”
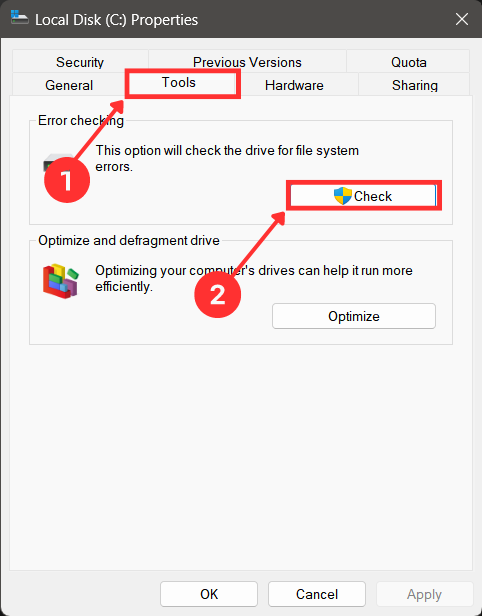
Step 4
Click on Scan Drive

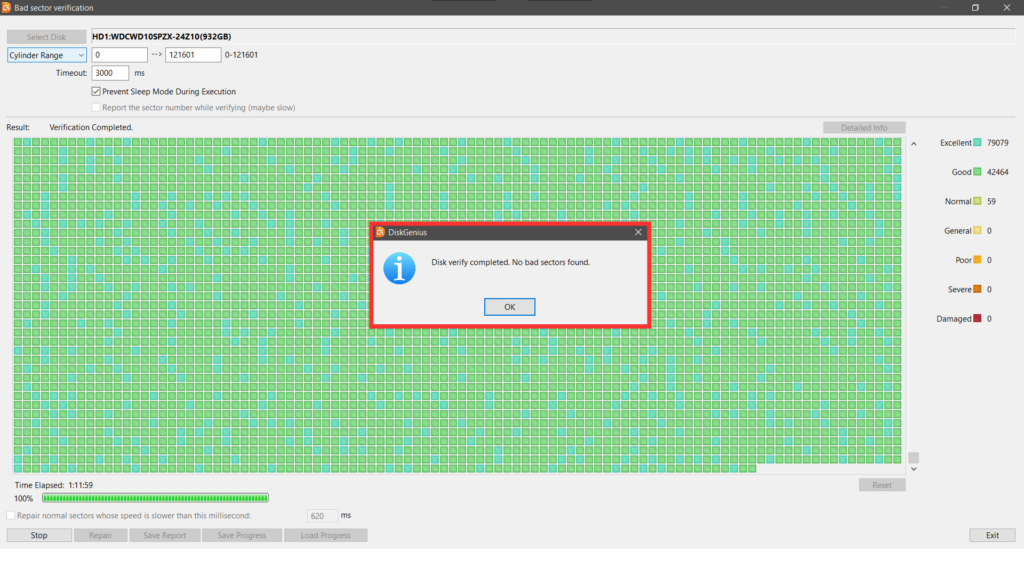
2. Check and repair Bad Sectors of HDD or SSD
The hard drive or SSD containing Windows may develop bad sectors over time. These sectors become defective, making it difficult for the operating system to read or write data, often resulting in a BSOD (Blue Screen of Death) and shows errors in the windows. To identify and manage bad sectors, there are several tools available to offer a straightforward scanning and repair feature for both internal and external disks. You can easily check for bad sectors using the following steps whenever necessary:
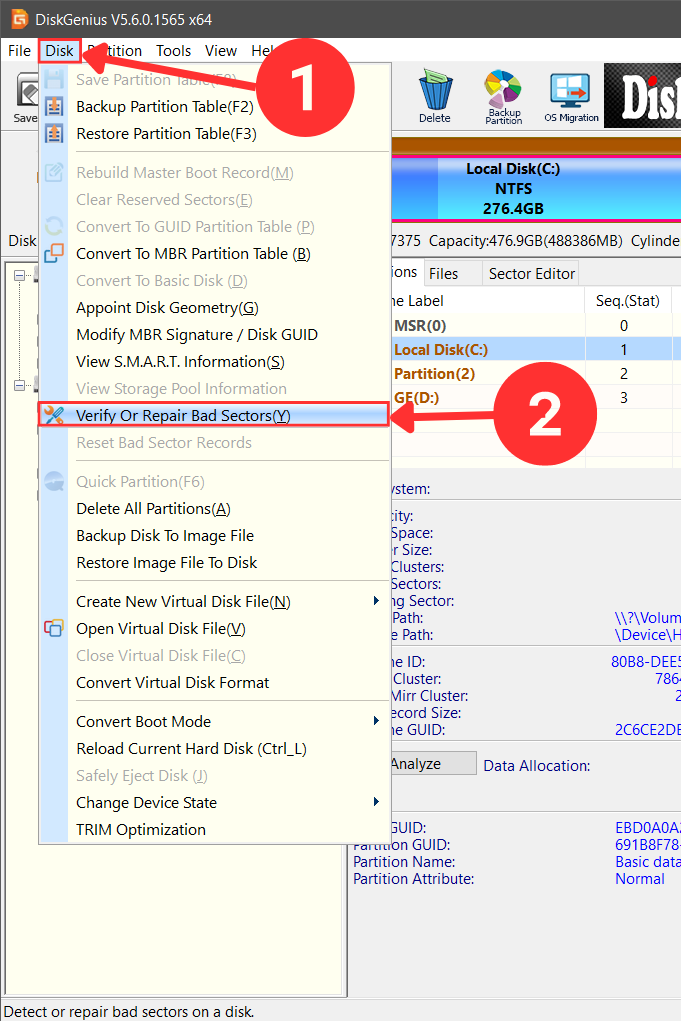
Step 1
Download and Install DiskGenius
Step 2
Launch the program
Step 3
Click on Disk Tab and Select Verify or repair bad sectors.
Step 4
Now Select the disk and start verifying
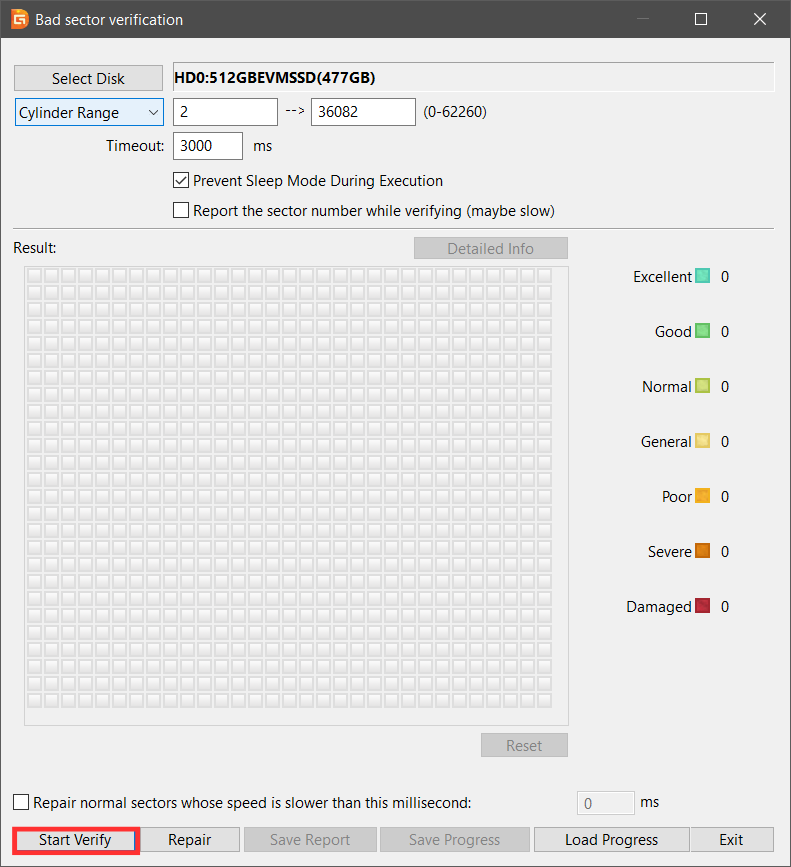
Step 5
After Verification the program will repair the bad sector for you if found.
3. Check Memory Problems
Memory issues may lead to error in Windows hence BSOD. To determine if your computer is affected, a reliable method involves testing the memory using the Windows Memory Diagnostic tool. This tool is designed to identify and diagnose memory-related problems that could impact the performance or reliability of your system. Follow the steps given below:
Step 1
Save your work and close all open programs to ensure data integrity.
Step 2
Type “Windows Memory Diagnostic” into the search box and run it as Administrator
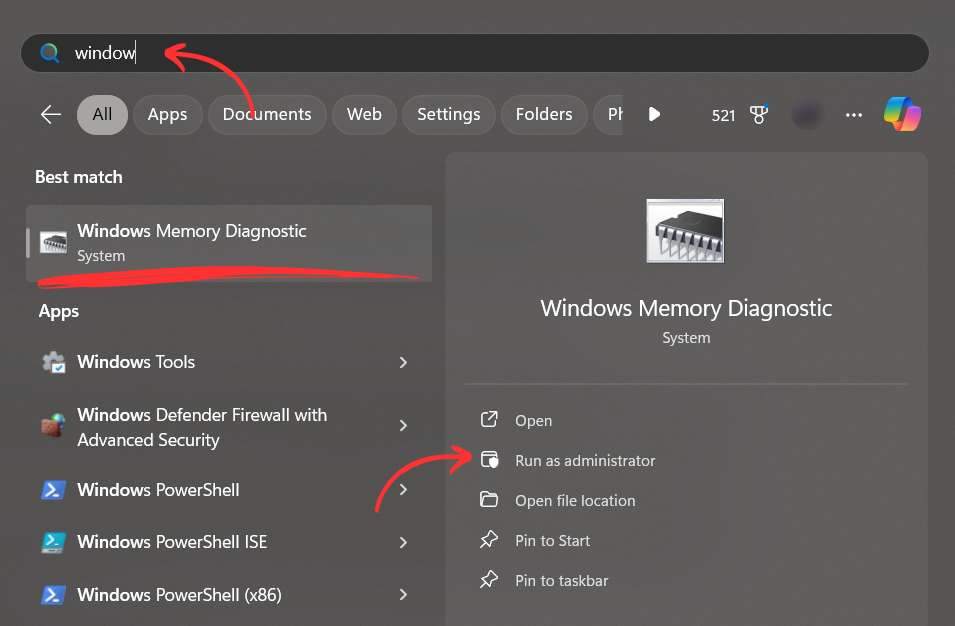
Step 3
Choose the option “Restart now and check for problems (recommended)” from the tool’s interface. This will prompt your PC to restart and commence the memory diagnostic process.
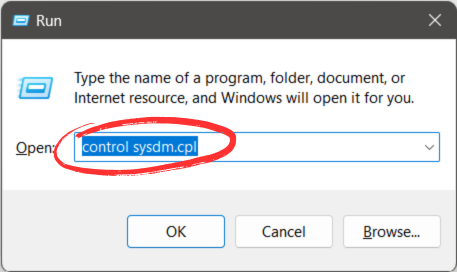
4. Change Memory Dump
A memory dump is like taking a picture of your computer’s memory when it has a serious problem, like a Blue Screen of Death (BSOD). When this happens, Windows captures information about what caused the problem and saves it into a file called a dump file. People can look at this file to figure out exactly what went wrong and why the BSOD happened. It’s like a detective tool that helps experts find and fix the issues causing crashes in Windows. Follow the steps given below:
Step 1
Press Windows key and R together to open Run
Step 2
Type the following command: “control sysdm.cpl” and hit enter
Step 3
Go to advanced tab, under startup and recovery click on “Settings“
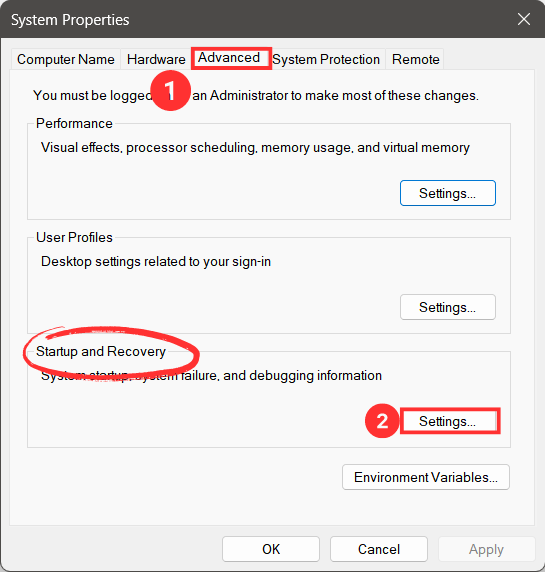
Step 4
Click on “Automatically restart” and then choose “complete memory dump“
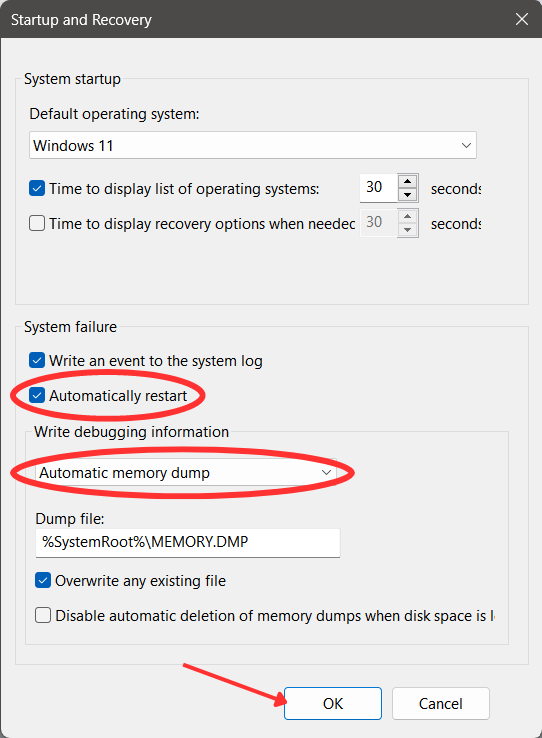
Step 5
Click “OK” to save and than reboot your computer.
5. Restore Registry Settings
Faulty registry configurations can also cause system crashes. Incorrect system registry settings, such as an entry with the wrong value or a missing key, can lead to these issues. Here’s how you can undo recent changes to the registry using Command Prompt:
Note: It is advisable to back up the current registry files before proceeding with the following steps. This precaution ensures that, in the event of any issues, you can restore the registry to its previous state.
- Open Command Prompt and run it as Administrator
- Type the following command one-by-one(press Enter after typing each command)
C: CD Windows\System32
CD config
DIR
CD regback
DIR
CD..
REN default default1
ren sam sam1
ren security security1
ren software software1
ren system to system1
CD regback
copy * c:\windows\system32\config
6. Rollback Driver
If the issue is caused after a driver update, then you must rollback the driver. Sometimes an updated driver can cause incompatibility issue leading to system failure. Follow the steps given below to rollback the driver:
Step 1
Open Device Manager
Step 2
Select the driver which you suspect to causing the issue.
Step 3
Right click on it and select properties.
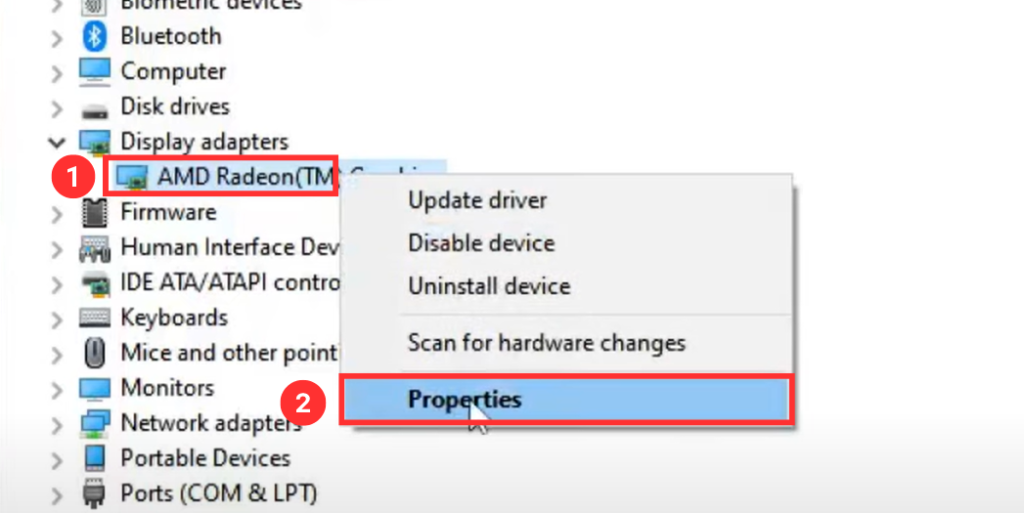
Step 4
Go to Driver Tab and Select rollback driver.
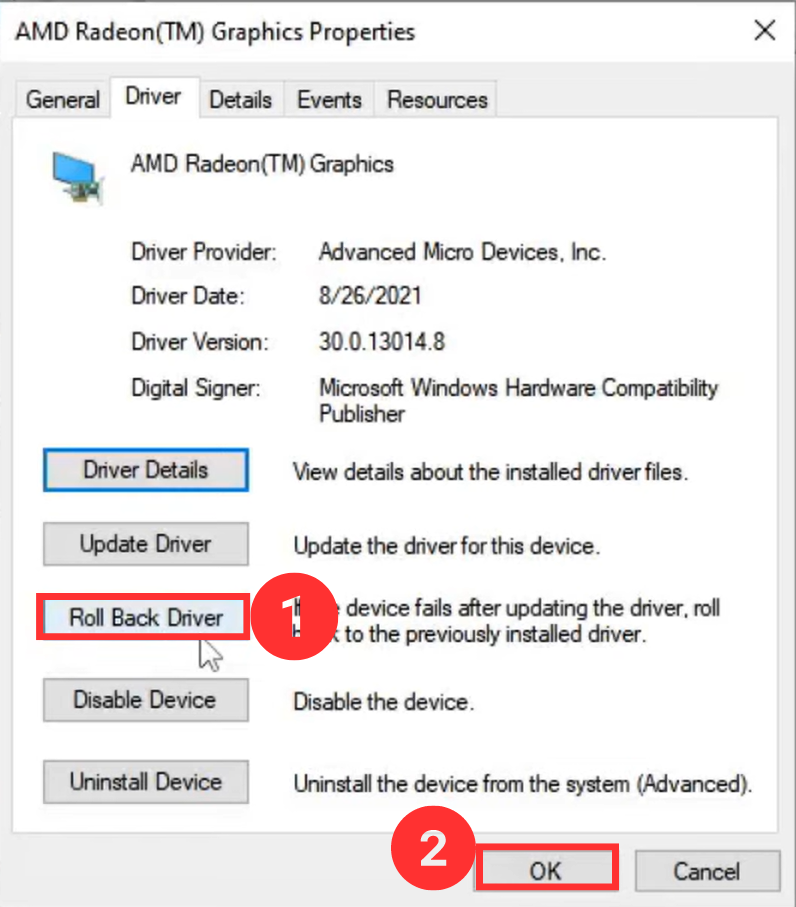
Now reboot your PC and see if the issue is solved or not. If the you still find yourself facing the issue then proceed to the next one.
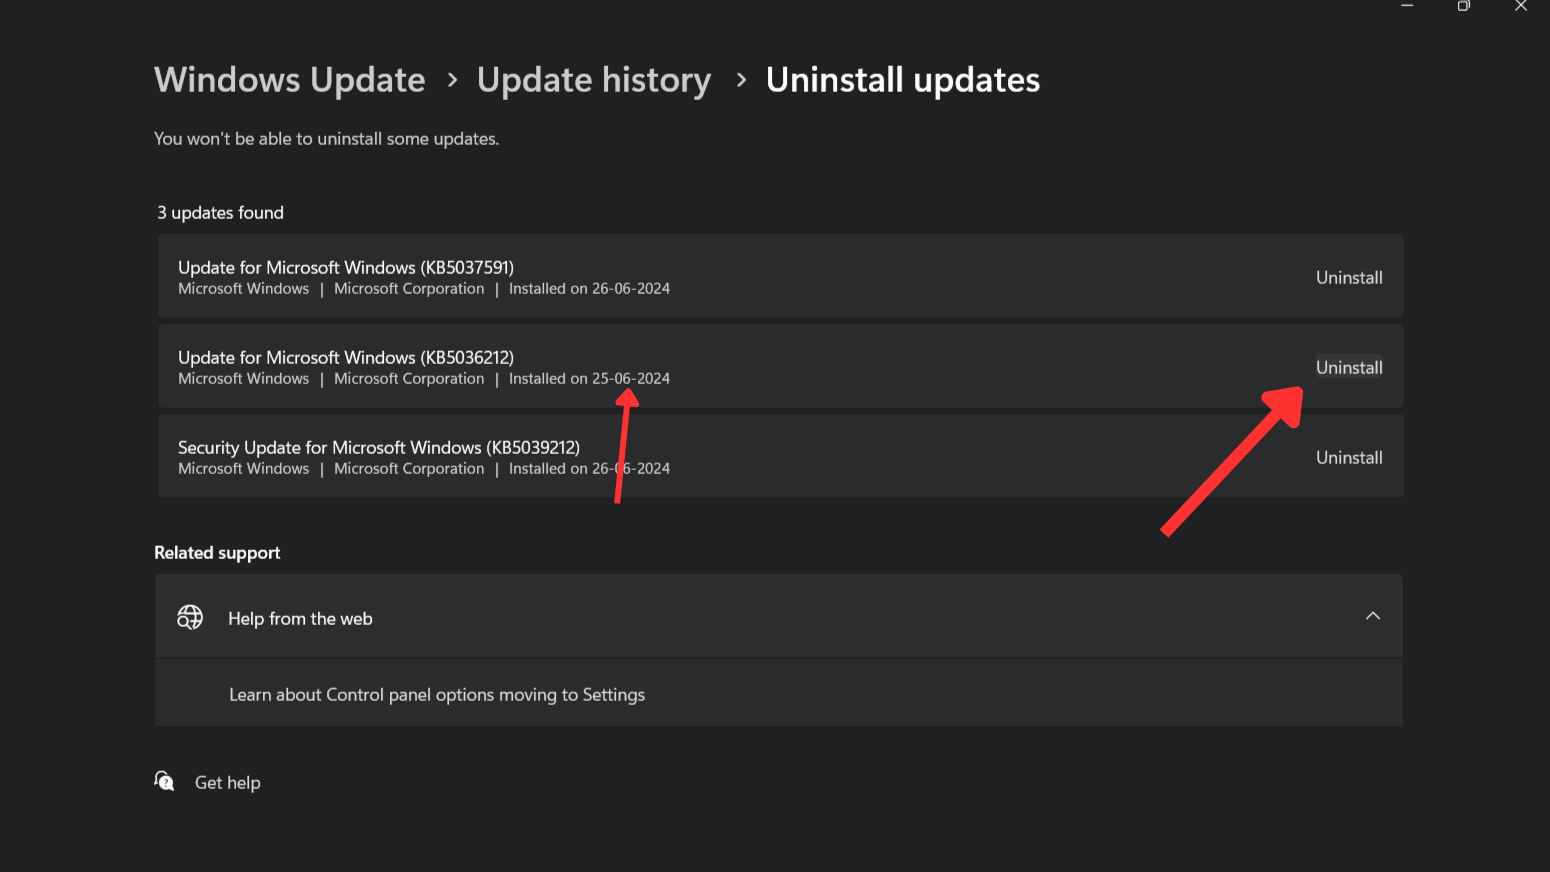
7. Uninstall Windows Update
Experiencing a Blue Screen of Death (BSOD) can be a perplexing and alarming event for many Windows users. This error message often states, “Your PC ran into a problem and needs to restart,” leaving users scrambling for a fix. One effective method to resolve this issue is by uninstalling recent Windows updates, which may have introduced errors or compatibility problems. Follow the steps to uninstall windows:
Step 1
Launch Settings
Step 2
Go to Windows Update and choose View Update History
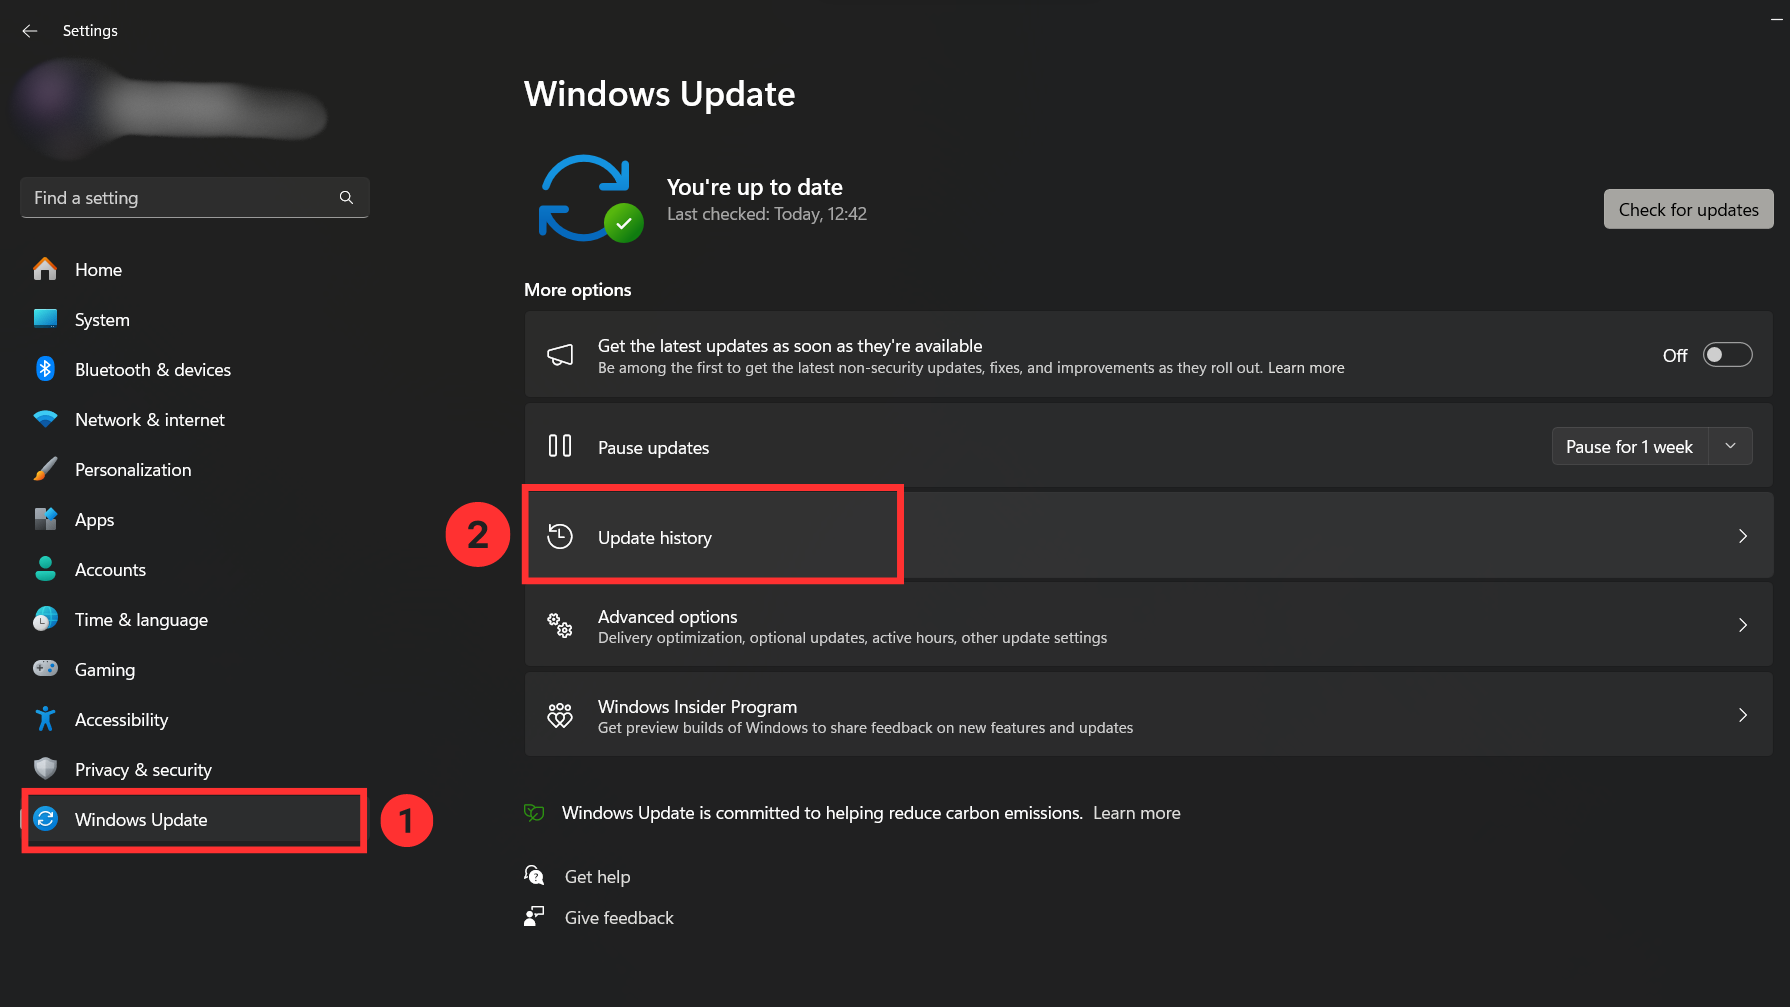
Step 3
Choose Uninstall Windows
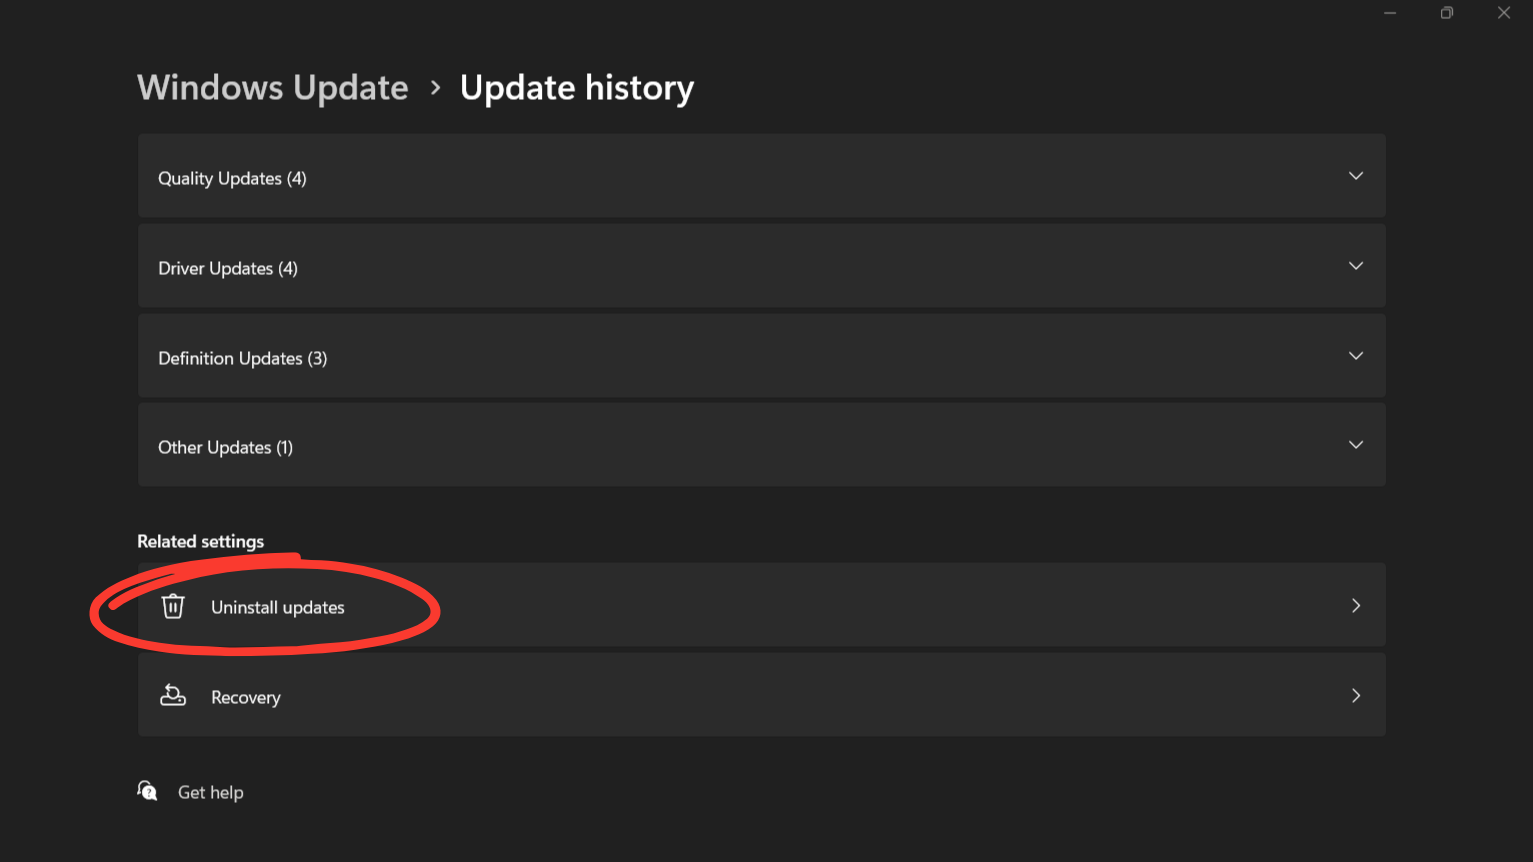
Step 4
Now proceed to uninstall the updates as per your judgment.
8. Reset BIOS
Resetting your BIOS to default settings can be a crucial troubleshooting step when encountering the dreaded Blue Screen of Death (BSOD). Over time, changes in BIOS settings due to hardware upgrades, overclocking, or software conflicts can lead to instability, manifesting as frequent BSOD errors. This straightforward procedure can often resolve BSOD issues, providing a stable platform for your computing needs.
Step 1
Restart your PC, press the key displayed on screen multiple times to access BIOS.
Step 2
Find and select “Advanced” in the menu.
Step 3
Enable “Reset Configuration Data.”
Step 4
Save changes and exit.
You can also practice the above methods even if your Windows does not boot. Open Automatic Repair Environment and then choose advanced options. Select Start up settings and then select whichever mode of start up in your favor.
Scenario 2: Stuck in Windows Loop
1. Windows Startup Repair
If your PC keeps restarting repeatedly, you can use startup repair to fix the problem. To resolve a continuous restart loop, you’ll need a Windows Recovery Drive or Windows installation disk. Start by inserting the Recovery Drive or disk into your PC and restarting. When your PC starts up, choose “Repair Your Computer” and go to Troubleshoot, then Advanced Options, and select Startup Repair. If your computer runs multiple operating systems, pick the one that needs fixing. Windows will then try to repair the operating system, allowing you to boot your PC normally without it restarting constantly.
2. Windows System Image Recovery
If you’re someone who diligently keeps a backup of your Windows image, you’re in great shape. You have the option to perform a complete system image recovery using that backup. Follow the steps given below:
Step 1
Connect the external hard drive containing the system image to your computer.
Step 2
Access the Windows Boot Options menu and choose “Troubleshoot” > “Advanced Options” > “System Image Recovery”.
Step 3
Select the specific system image you wish to recover.
Step 4
In the Re-image your computer wizard, choose the selected system image and click “Next“.
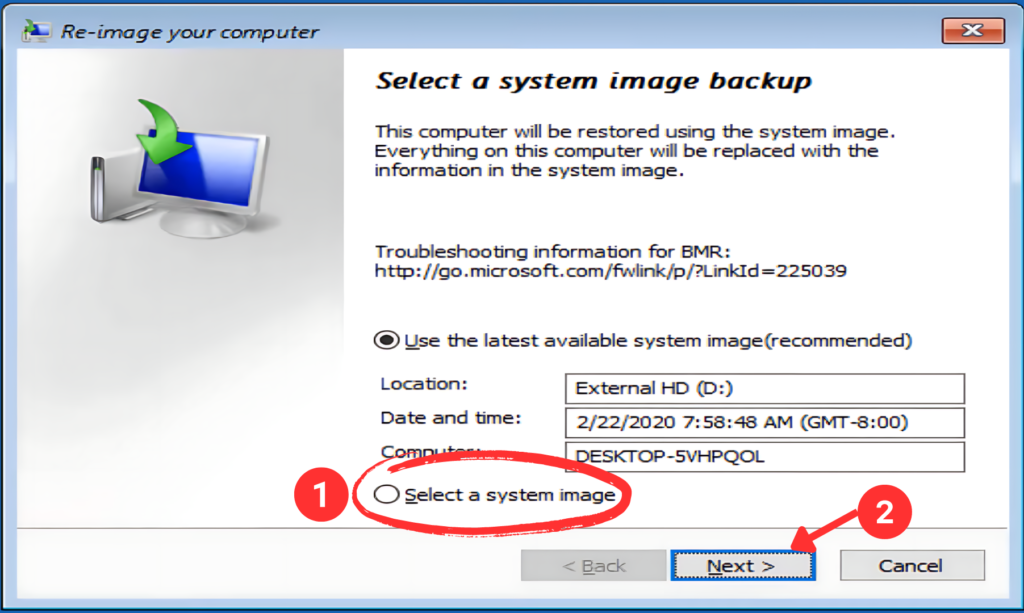
Step 5
Follow the wizard’s instructions to format the disks and initiate the system restoration process.
Step 6
Restart your computer after Windows Installation is done.
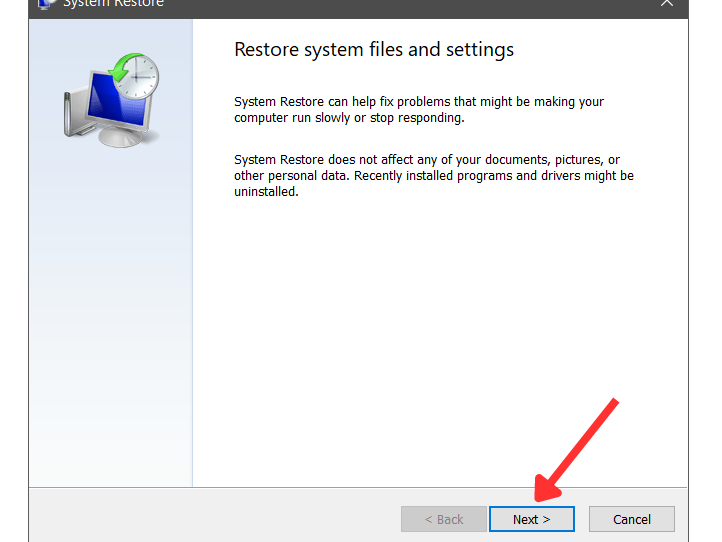
3. Perform System Restore
Having created system restore points previously enables you to revert your operating system to a previous state when applications and registry files were functioning correctly. This will magically solve your Blue Screen error.
Step 1
Open Windows Recovery Environment
Step 2
Select Troubleshooter > Advanced Options > System Restore
Step 3
Choose Account to continue
Step 4
Click “Next“
Step 4
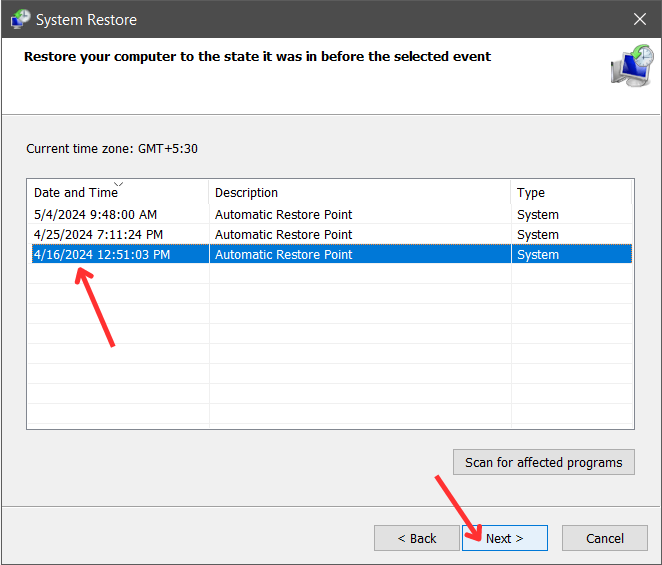
Now, choose a restore point that will return Windows to a previous date without the blue screen error, then proceed by clicking “Next.”
Step 5
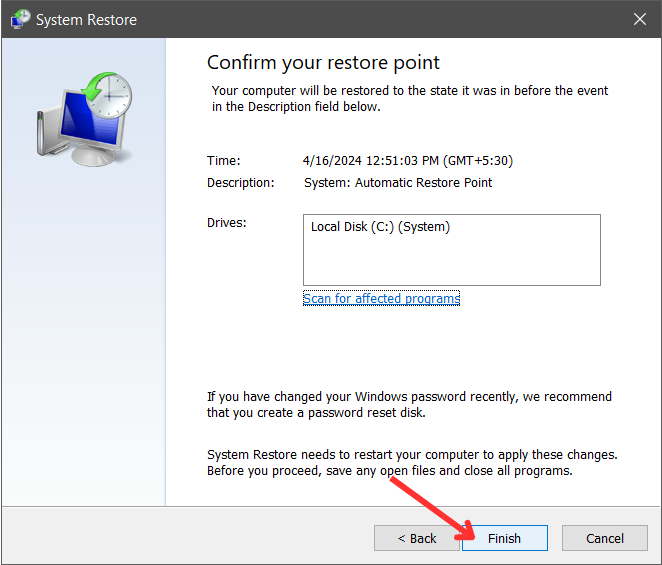
Click on Finish and then Click on Yes to begin operation.
After completion, restart your PC. If it still display “Your Device Ran into a Problem” proceed to next method.
4. Reset Your PC
If the all the method listed above did not fix your pc run into problem. Then Resetting your PC is last option. Follow the below steps:
Step 1
Go to Troubleshooting
Step 2
Choose Reset this PC
Step 3
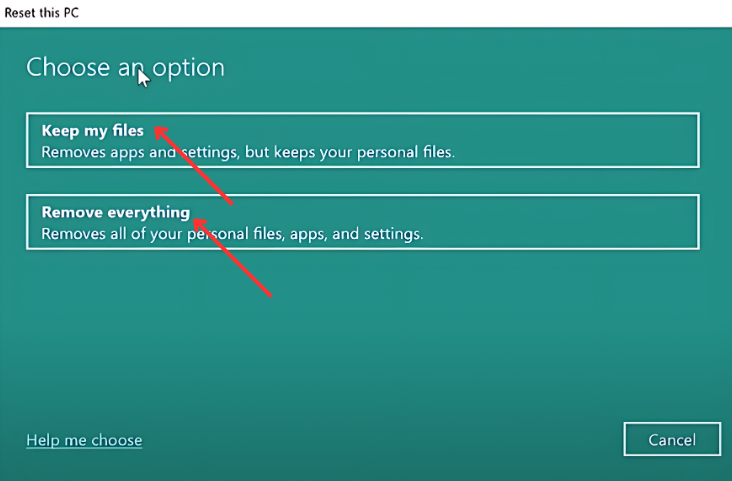
Choose either “Keep my files” or “Remove everything”
Step 4
Click Next
Step 5
A warning will appear, Click Next
Step 6
Click Reset and Continue
Seeking Further Help
If you continue to encounter the BSOD, we advise the following steps:
- Seek assistance from your nearest repair shop or authorized service center in the event of hardware failure.
- Visit Microsoft Community forum to find additional ways to fix this issue.
Conclusion
Addressing the “PC Ran Into a Problem” error requires a systematic approach tailored to specific scenarios and understanding the underlying causes of BSOD. Novice PC users can resolve this issue by employing various troubleshooting methods highlighted in the guide. By diagnosing and addressing hardware conflicts, updating drivers, and utilizing recovery tools like Windows Recovery Drive, users can mitigate BSOD occurrences. Moving forward, staying vigilant with system updates and regular maintenance will help maintain system stability and prevent future errors. For comprehensive assistance, consulting professional repair services is advisable in case of persistent issues.
![301+ Best Actor Hashtags for Instagram 2024 [Updated]](https://gadgetsexpo.org/wp-content/uploads/2024/08/301-Best-Actor-Hashtags-for-Instagram-2024-Updated.png)
![307+ Best Attitude Hashtags for Instagram 2024 [Updated]](https://gadgetsexpo.org/wp-content/uploads/2024/08/Best-Attitude-Hashtags-for-Instagram-Updated-.png)
![407+ Best Anime Hashtags for Instagram 2024 [Updated]](https://gadgetsexpo.org/wp-content/uploads/2024/08/Best-Anime-Hashtags-for-Instagram-Updated-.png)
Leave a Reply